Thursday, June 16, 2011

BACK WITH A HEARTY BREAKFAST

It's past my bedtime and sleep begs but I am itching to blog, really busting to lay down a recipe before another day passes.

My three-week hiatus can be explained by the recording and airing of my first Insight program since I got the producer gig. It was a raging success, and took up a lot of time and energy.

I've also been scarce on these pages because my cooking as been pretty basic. But then I think of all the recipes in newspapers and magazines that I would have written off as too simple to publish. I realise we all like to read simple ideas to inspire us in the kitchen, and most of us cook basic stuff most of the time.

So what have I been cooking lately?

A lot of porridge. Billie is a porridge monster. It was one of the first words she uttered on a regular basis without any prompting. So we have become quite the porridge chefs.

My favourite this week - and also requiring only four ingredients - is pear and ginger creamy porridge.

Another popular one is spiced creamy porridge with dates.

Porridge does not photograph well so we will leave it up to your imaginations.

PEAR AND GINGER CREAMY PORRIDGE


Serves three


1 and half cups oats
1 and half cups milk
1 and half cups water
1-2 pears, chopped into small pieces (no need to peel)
Half teaspoon powdered ginger


Place all ingredients in small pot on medium heat and bring to simmer (with lid on). Turn to very low and simmer until creamy consistency but still a bit of liquid left. (Takes about as long as you take to shower and dress, if you're fast).


SPICED CREAMY PORRIDGE WITH DATES


Serves three


1 and half cups oats
1 and half cups milk
1 and half cups water
1/4 teaspoon cinnamon
1/4 teaspoon powdered ginger
1/4 teaspoon nutmeg (freshly grated if you can)
9 dates, chopped

Place all ingredients in small pot on medium heat and bring to simmer (with lid on). Turn to very low and simmer until creamy consistency but still a bit of liquid left. (Takes about as long as you take to shower and dress, if you're fast).


Tuesday, May 24, 2011

WHEN YOUR OWN BACK-YARD FAILS, EMBRACE THE COMMUNITY


It may be the weather, Billie tampering with our tiny seedlings, or it could be my lack of skills and experience. Either way, our little vegetable and herb garden is refusing to play ball.

Just when I thought I was going to have to give up gardening until the spring and plunge back into buying herbs, a wonderful new neighbour has arrived on the scene. The new Waverley Park Communal Garden has came along at just the right time.

Billie and I donned our new gumboots on the weekend and walked around the corner with the stroller basket full of gardening equipment, and freshly cooked food for the working bee shared lunch ( I made my Super Patties with Tofu, Brown Rice and Walnuts, which went down a treat).

Thanks to the group that petitioned Waverley Council for permission to build four large no-dig gardens at the edge of the park. The council even came to the party with generous donations of equipment and the commissioning of local artist Emma Anna to produce a fabulous sign (see pic above) to explain what these great big shiny rain tanks are doing plonked on the grass.

One of the four raised gardens, with it's own underground reservoir attached to pipe

Billie had a ball all morning playing with exciting toys she doesn't have at home - scooters, ride-on cars, and felt-tip pens. A family from across the road had brought it all over, and a couple of mothers even turned it into a mini-creche  -  allowing me to get into the gardening knowing Billie was happily collecting sticks and pine cones in a trolley. 


I learned much about how to make a very good raised garden. Tip number one: You need A LOT OF GOOD SOIL. These beds are actually the same width and length as the one we built at home. But about ten times deeper. 


We also built a rather complicated water reservoir system, which I was assured isn't that complex and is actually fairly essential in a warm country with water shortages. I guess being community gardens they need to be able to survive without daily watering in the summer holidays. 

Basically, we dug a shallow hole the exact size of the metal tank we were to place on top for the raised bed. 


We then lined it with plastic - like you would for a fish pond - and then placed a layer of gravel evenly over the hole.


Then a plastic pipe with holes drilled along its length was placed on top, with the pipe's end sticking out of the ground. Gravel was then used to completely cover the pipe (except the bit sticking out of the ground, which is where we will feed water and worm fertiliser into the mini reservoir under the garden).


Billie learns how to create a 'wicking' from gravel to separate the plants and the soil etc from the water reservoir

We next laid a plastic weed cloth, some hessian sack as it was lying around, and then a whole lot of nice organic dirt. 


Next we built up layers of straw and rich compost (they had a particularly nice one made of bio char). 
We finished with a layer of straw and a good water. Seedlings were about to be planted when Billie and I headed home for her sleep.


A fabulous, educational and inspiring morning. We'll be back for the monthly working bees and of course we'll poke our heads in on the way to the playground each week. Looking forward to grabbing a bit of parsley on our way past.


So what's wrong in my own back-yard? I can't even blame the soil - or lack of - as I have transplanted my silver beet seedlings into pots of potting mix, and sowed basil and parsley seeds straight into pots. But weeks later all we have are tiny seedlings, going nowhere, except into Billie's mitts. I have healthy leafy aubergine plants with no eggplants, and pepper plants producing tiny stunted capsicums. Oh well - the solution is just around the corner at Sustainability Street Bondi Junction, St Mary's Street.


While we get gardening on Sustainability Street, Billie picks up a four-wheeled bad habit

Thursday, May 19, 2011

BRAZILIAN BLACK BEAN SOUP with RED PEPPER and LIME


It's the season to be soupy - if you're down-under at least. I made some fantastic soups this week. They didn't just taste it, they looked great too - often an issue with soups that wind up a dull brown or grey.

I have made various versions of black bean soup over the years, but usually they are blended to a thick blackish puree. While tasty, I have felt a little odd gulping back black goo.

This hearty ensemble is a departure from that blended style and quite impressive to serve up: Soft black beans in a dark purple broth alongside strands of red pepper; with a generous dollop of sour cream, sprinkled with shavings of lime rind and fresh coriander leaves.

I adapted this recipe from a soup based around a bacon hock. I wasn't sure if a vegetarian version would cut it, and maybe it wouldn't if you had tasted the meaty version.

Billie had no complaints, and neither did my blog pal Violet Tingle. I took it to her place ahead of a Friday night blogathon. Alas, Blogger was down and so was Ms Tingle's internet. So we just ate soup. Bread is not needed but it pals well with lager.


And don't dare leave out the sour cream. If possible go for a good quality version that is literally soured cream and therefore quite runny. (If you're in Australia this means Barambah - and I'm not being paid).


BRAZILIAN BLACK BEAN SOUP with RED PEPPER and LIME


(Adapted from a Julie Biuso recipe)


2 1/2 cups black beans (also called turtle)
3 Tablespoons olive oil
2 onions, chopped finely
6 cloves garlic, crushed
1 tablespoon ground cumin
pinch of cayenne pepper or chili (more if desired)
4 bay leaves
fresh ground black pepper
2 Tablespoons parsley, chopped
1 stock cube
salt
1 tablespoon fresh lime juice
1 red pepper (capsicum), chopped into bite sized pieces (reserve some for garnish)
2 Tablespoons fresh coriander, chopped


Garnish:
sour cream
extra chopped fresh coriander
one lime to zest and juice
the red pepper pieces from above


Rinse black beans and soak in 7 cups of cold water - for about 8 hours. Drain and rinse. 


Heat oil in large pot and saute onions and then garlic over a low heat for about ten minutes or until soft. Add spices, followed by beans and 3 litres of water (just 1 litre if beans already cooked in pressure cooker) with a dissolved stock cube, the bay leaves and black pepper. Bring to boil, add parsley and lower heat. Simmer with lid off for two hours or until beans are very soft. 


Add lime juice, red pepper and fresh coriander. Check for seasoning - you'll probably want to add a teaspoon of sea salt. Cook for another ten minutes.


Place in bowls and garnish with a spoon of sour cream, some red pepper, coriander and lime zest. Squeeze a generous squirt of lime juice over the top - this tastes great and gives you some extra vitamin c to absorb the beans from the iron. The red pepper will do this also.


Delicious, filling and healthy.


NOTE FOR PRESSURE COOKER USERS: If you have a pressure cooker you can reduce soaking and cooking time substantially. Soak beans for a few hours and then place in pressure cooker with 5 cups cold water and cook for 15 minutes once up to pressure. They don't need to be fully cooked as will continue to cook in the soup. Meanwhile, get the broth going - but use 1 litre rather than 3 of additional water. Add the beans and their cooking liquid to the broth and simmer down for 45-60 mins with the lid off.


FOR BABIES 7 MONTHS AND OLDER: Reserve some well-cooked beans (before cayenne and salt is added) and puree.
FOR BABIES 10 MONTHS AND OLDER: Remove beans from soup and serve as finger food.
FOR BABIES AND TODDLERS 12 MONTHS AND OVER: Serve as is - stirring a generous amount of sour cream through if they aren't partial to a little heat (it's only mild anyway)

Monday, May 9, 2011

MILES' SPICED PUMPKIN AND SORREL SOUP


Sarah has the day off for Hallmark's celebration of motherhood. So I'm at the Mac helm.
We spent a loverly day gardening, brunching with a friend, singing to Billie and finally chopping up a big ol' pumpkin to make a super soup.


 I did create this delish dish last week in my slapdash funnel of random ingredients way. Why make the same meal twice?

Sarah believes that if you, the reader, would like to share our yummy goodness you will need measurements. I had to agree. So tonight we did a re-creation of last week's soup; turning "oh a few spoonfuls" and "I think I just poured for like 5 seconds" into real figures.

The result is a very similar soup to my inspired melee a week before. It tastes better than desert, is mildly spicy and goes well with a nice slice of jalepeno bread from Bondi Junction markets.

This recipe should make enough for 3 and lunch the next day. Billie who is becoming somewhat finicky as she matures or just unpredictable ( devouring a particular meal one day and shunning it the next), vacuums this powerful blend of veggies into her mini-maw.


MILES' SPICED PUMPKIN AND SORREL SOUP

1/4 pumpkin, chopped into chunks (leave skin on)
olive oil
2 tablespoons butter
2 onions, chopped
2 celery stalks, chopped
3 cloves garlic, crushed
1 stock cube, dissolved in 1 and 1/4 cups boiling water
1 tablespoon tamari (or soy sauce)
1/2 cup desiccated coconut
1 tablespoon olive oil
1/8 teaspoon cayenne pepper
1/2 t cinnamon
1/2 t ground ginger
1 t ground cumin
6-8 sorrel leaves
4 stalks fresh coriander (use roots, stalks and leaves)


Heat butter and a little olive oil in a large pot on low to medium heat. Saute onion, garlic and celery until soft. Add pumpkin, sorrel and then stock. Bring to simmer and then lower heat, replacing lid. Combine spices and olive oil in small bowl to make a paste, then stir through soup with the coconut. Add chopped coriander - using the roots and all adds lots of flavour. Stir frequently, and once the pumpkin is very soft remove soup from heat. Use a stick blender to puree in pot, or transfer to blender/food processor. Reheat if necessary and enjoy.

While we have added a dollop of yoghurt for aesthetic purposes, it really isn't necessary for taste. In  fact, I would say go without. And this is a soup you can safely serve without bread. It's delicious.


Monday, May 2, 2011

SOMETHING FOR KATE - MEDITERRANEAN QUINOA SALAD

Mediterranean Quinoa with Caribbean lime fish

I love the way recipes take on a folk lore of their own.

I took this super salad from Cynthia Lair, who in turn credits a student named David St Martin. No doubt David was inspired by someone else somewhere along the way.

Quinoa is of course a SUPER food - fantastic source of protein, amino-acids and many minerals such as iron. It's not actually a grain - it's a seed - but it can be used in place of many grains. It's also easy to digest so good for babies just starting solids.

I brought Mediterranean Quinoa along to our weekly office Food Club, and it was a hit. My colleague Kate has been asking for the recipe ever since. We've had some extraordinary salads during Food Club's short life, and I wasn't the first person to bring quinoa.

Office Food Club


This was also a raging success served with Cynthia Lair's Caribbean lime white fish. Both recipes can be found in her fabulous Feeding the Whole Family.


MEDITERRANEAN QUINOA SALAD


1 cup quinoa
1 3/4 cups water
1/2 teaspoon salt
1/4 cup pine nuts
1/4 cup olive oil
1/4 cup lemon juice
3 tablespoons chopped fresh mint
3 tablespoons chopped fresh parsley
2 scallions, thinly sliced
1/4 cup currents
1/2 block feta cheese, crumbled


Wash, rinse and drain quinoa. Place water in a small pot with salt and quinoa and bring to boil. Lower heat and simmer gently with lid on until water absorbed (takes about 15-20 minutes). Don't stir, instead tilt the pan to one side or slip a fork in to see if any water on bottom. Removed lid and leave to rest for ten minutes.


Meanwhile, place pine nuts in a dry frying pan (without oil) and gently toast over medium heat. Stir regularly and remove from pan as soon as begin to change colour and give off aroma. 


Combine olive oil, lemon, mint and parsley in large bowl. Add scallions, currents and pine nuts. Add warm quinoa slowly, then feta, and combine well. Serve at room temperature.


FOR BABIES 6 MONTHS AND OLDER: Put aside a little quinoa and puree
FOR BABIES 9 MONTHS AND OLDER: Reserve some salad before feta is added and blend
FOR BABIES/TODDLERS 12 MONTHS AND OLDER: Serve salad as is

Thursday, April 28, 2011

SPINACH, FETA AND YOGHURT PIE


This delicious pie was born after a frustrating attempt at a recipe that involved milk. The darn thing never cooked, wouldn't slice and was not appropriate for picnics.

However, this quiche sets easily, slices well and is made for travelling. It also impresses guests, hence I'm making it tonight for a friend for dinner.

BUT, you must use full-fat thick yoghurt. None of that runny, skinny stuff. I also use a lot of eggs.

Homemade pastry really kicks this dish into the upper echelons of eating. However, if getting the rolling pin out is enough to send you running, please wander the freezer section of your supermarket and pick up some short crust sheets.

To make this pie really stand out from the crowd I use coconut oil, as well as butter, for the pastry. This idea comes from Cynthia Lair's Feeding the Whole Family.  Coconut fat has no cholesterol and lots of other good stuff going for it. You need to appreciate the faint taste of coconut, but it's not over-powering. Coconut oil comes in jars as a solid form - like the consistency of ghee - and is great for frying as does not burn. It's available from health food shops but if you haven't got any, stick with butter.


SPINACH, FETA AND YOGHURT PIE


Pastry: 
1 cup whole wheat flour
2 tablespoons coconut oil
2 tablespoons cold butter
2 tablespoons cold water (the colder the better)


Filling:
1 and a half cups full-fat thick yoghurt
6 eggs
Bunch fresh spinach leaves (English spinach, NOT silver beet)
1 block feta cheese, crumbled
pepper - a few grinds


If making your own pastry, put flour in food processor and add fats. Pulse until crumbly, then slowly add water while pulsing. Mixture should gather into a ball after enough pulsing, or it may need a bit of help form your hands. 


If you don't have a food processor, use a large mixing bowl and cut butter and coconut fat into the flour. Slowly dribble water in, mixing with a fork, until you have a moist, pliable dough. 


Gather into a ball and place in container in fridge for about 20 minutes. Preheat oven to medium hot. Then roll pastry out on a floured surface or a piece of baking paper. Make it quite thin and line a greased round pie tin. Bake it 'blind', ie empty, for ten minutes. ( I use a sprung cake tin, which then can be removed before serving. But any pie dish will do.)


Wash, dry and chop spinach then combine with crumbled feta. Whisk eggs and pepper then gently combine with yoghurt. Place spinach and feta in pie crust. Pour eggs and yoghurt evenly on top and bake in centre of oven for 35-40 minutes. Check, and put back in oven for another ten minutes if not set or lightly browned. Do the cake test - place a knife or skewer in center, and if doesn't come back clean it needs more oven time.


Allow to settle and cool a little before slicing. This pie also works very well cold.


Monday, April 25, 2011

HAPPY BILLIE BITES BIRTHDAY RELAUNCH

We did it. The mission was to get Billie eating the same food as us within a year  - from when I started this blog in April 2010.

She was a 7 month mush-eater then, and I was appalled at the prospect of cooking separate meals - as many parents regularly do.

I asked myself, how do I introduce my daughter to the wonderful world of food?

The biggest challenge to my cooking had arrived.

Well, I thought that was the case.  But then Billie quickly developed a reputation as a darn good eater. Nothing got in the way of her appetite. So it wasn't too hard sticking to the one-family-meal plan.

Instead, the greatest challenge to my cooking arrived a little later. It's been a gradual shift. Late last year the change began.

Now we are faced with a discerning eater. Unpredictable. Unexplainable. Surprising. Random. But often eager. Food is still fairly close to the centre of Billie's world. She's still the toddler found nibbling from the buffet when the crowd has moved on.

Foods that continue to please every time: black beans, kidney beans, white beans, any beans (but not green), cheddar, ricotta, blue cheese, Camembert, feta, soba noodles, pasta, muesli, yoghurt, blue berries, apples, mandarins, peanut butter, Vegemite, crackers, sultanas, currents, dates, prunes, potato, red sauce, spicy foods, capers, olives, grapes, pesto, vegetarian nachos, daddy's vegetable sauces and mashes and soups that taste of vegetable but don't share the texture, pancakes, anything sweet, toast, bread and did I mention bread?

That looks a fairly good list, true. But note the lack of vegetables. Here are the foods embraced with gusto one day, and refused without tasting the next: eggs, mushroom, spinach, pumpkin, fish, quinoa, rice, tofu, tempeh, sweet potato, milk, strawberries, pear, and the list does go on.

I'm sticking with my philosophy of one-meal-for-one-family. I fear I may get very frustrated, grow to dislike cooking, and wind up with a fussy five-year-old if I do anything else.

I've swung between trying to cater to Billie's ever-changing tastes - impossible as it's without rhyme nor reason - and just serving up what I feel like eating.

When I do make a separate special meal for her, she often turns up her nose at what I thought was the flavour of the week.

So I reckon the best compromise may be:

  • Once a week do what Miles did tonight - cook up a vegetable sauce to be blended and stirred generously through pasta - a success every time. This gave her broccoli, onion, garlic, tomato
  • Serve up a variety of whole foods each night - different textures, flavours and colours - whatever the household is eating
  • Try and have one thing on the plate that she/he will LIKELY like, so at least eating something
  • However, at least once a week leave out the always-favoured - Billie's is bread, pasta, noodles, cheese - so the hungry child is encouraged to broaden their palette

I'll keep you posted on our work-in-progress.

Yes, it's been a while between recipes. Hope you like the re-design for the re-launch. Tasty recipes coming your way this week: Mediterranean Quinoa Salad and Spinach, Feta and Yoghurt Pie. 

Tuesday, April 12, 2011

Nana's Melting Moments

My Nana bakes the best cookies: Afghans, Anzacs, Shortbread - but most importantly- Melting Moments.


Nana walked off the plane with a ridiculously heavy bag when I collected her from Auckland airport on a recent trip home to New Zealand. Aside from the bundles of green beans from her garden, her bag was weighed down by some serious short bread. Two batches. One's always better than the other.

But there were no Melting Moments. Too rich she said. But necessary, I decided, for the afternoon tea party I was throwing my friends before we returned to Sydney.

I did my best to get this recipe down as accurately as possible, but it was one of those 'add a bit more flour if mixture's too wet to roll' etc.

The biscuits were a hit. They literally "melted in the mouth", a few were heard to comment.


Nana makes her fabulous Melting Moments


NANA'S MELTING MOMENTS


1/2 pound butter (225g)
2 ounces icing sugar (60g)
1/4 pound corn flour (113g)
1/4 pound plain white flour (113g)
dash vanilla
pinch of salt
(As you can see this recipe was not created in metric. But I have converted it)
ICING:
Icing sugar and lemon juice. Quantities not available as Nana just did my eye - but you want a THICK icing.


Heat oven to moderate.


Cream butter and sugar well. Add flours and vanilla and salt. 


Place baking paper on baking tray. Roll mixture into teaspoon-sized balls and place on sheet. Flatten with fork, both ways. 


Bake in centre of oven for 12-15 minutes or until JUST coloured. They cook fast and you don't want them brown.


Remove onto wire rack and ice when cool. TO ICE: Spread just a little icing on the back of a cookie and then sandwich with another biscuit of the same size.


Serve once icing set. Store in airtight container - but you'll be lucky if any are left over.


Billie hosts her gang of NZ friends

Sunday, April 10, 2011

AUTUMN HARVEST


I've bragged about our backyard organic cherry tomato supply - now not looking so hot after a lot of rain, a drop in temperature, a lack of sun and perhaps under-nourished soil.


However, now that the tomato plants have calmed down, the aubergines and peppers are getting a chance.

I was amazed to return from a ten-day holiday to find a large aubergine/eggplant and several smaller neighbours, mostly on the same laden plant. One is looking very purple and ready for vegetarian moussaka.

Aubergine Feast
One Yellow Pepper


But only one pepper/capsicum has materialised from a handful of fairly large leafy pepper plants. Not sure what went wrong there - research required.

Overall though it's been very satisfying growing all this food from seed. Billie has been a fantastic little helper throughout.


I've been waiting patiently for this sole pepper to turn red, but today Billie and I noticed the garden fauna was not being quite so patient. An ant was nibbling away inside a hole presumably left by a worm.

So Billie did the honors and appeared to get great satisfaction from pulling the yellow capsicum off the plant.

I only wish she would show so much enthusiasm when it turns up on her dinner plate tonight.

Billie pretends to eat our freshly-harvested pepper

Friday, April 8, 2011

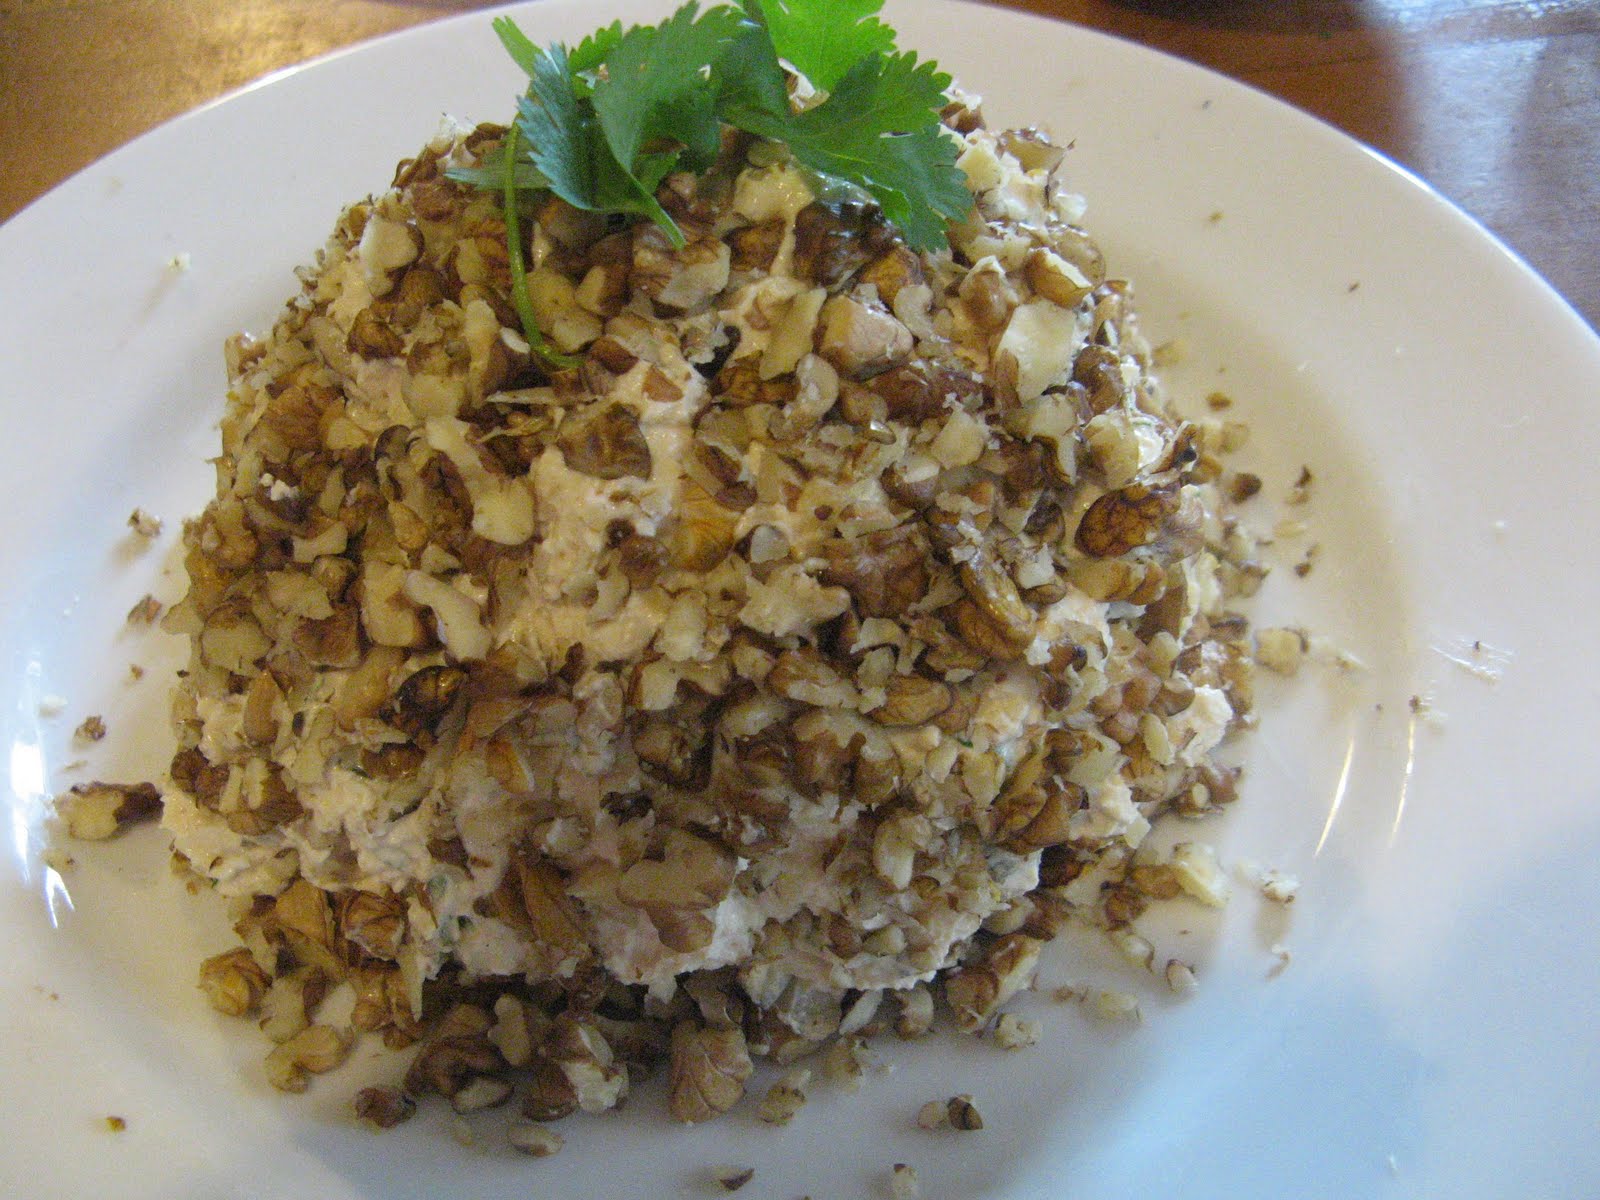
1980s Cheese Ball Revival

Before there were fancy cheese boards, there was the Cheese Ball.

Probably they weren't available, and probably they were too pricey. But brie, blue vein, Camembert, goats cheese, feta and Gouda were not found in our fridge when I was growing up. Now my mum's fridge is positively bulging with nice cheeses.

I hadn't thought of this Cheese Ball until a reader - an old friend from high school - made a special request. In fact she had to ask twice. I confess I was a little ho hum at first.

However, my mother and I dug out this Cheese Ball recipe on my recent visit back to New Zealand. And I'm very pleased Kura sent me on this treasure hunt.

The Cheese Ball had a fabulous revival at an afternoon tea I hosted in Auckland. Several guests requested the recipe. It was notably gobbled up ahead of other dips and cheeses.


The recipe is adapted from a New Zealand Play Centre cook book.

CHEESE BALL


250g cottage cheese
250g cream cheese
1 1/2 cups cheddar, grated
3 Tablespoons chopped gherkins
2 T tomato sauce/ketchup
3 T finely chopped onions
3 T finely chopped parsley - or other herbs such as oregano and basil
1 T Worcestershire sauce
dash Tabasco sauce (optional)
1 cup chopped walnuts (other nuts and seeds can be used: sunflower, sesame, almond)


Mix all together except for nuts. Shape into a ball, or if too soft refrigerate for 30 mins or longer. Shape into ball and cover with nuts. (You can toast the nuts first but make sure they're cool before putting on cheese ball. Toasting is purely optional). Place in fridge until ready to eat. Serve with crackers.


Next up, another foray back in time: Melting Moments. Not just any, my Nana's melt-in-your-mouth versions. Stay tuned.


Afternoon Tea Party: Billie and her Kiwi mates

Followers